DD
MM
YYYY

PAGES

DD
MM
YYYY

spot_img

PAGES

Home Blog Page 3157

A Complete Guide to Windows Server Backup and Restore

0

What Is Windows Server Backup

It’s crucial to make a backup of your information, since losing data may be highly expensive. Especially, the value of backups is much more important when it comes to servers. An organization’s server is significant because it gathers and distributes user-requested files and information.

Windows Server is an operating system developed by Microsoft specifically for servers. Unlike regular consumer PCs, servers are high-performance machines that operate continuously. By implementing Windows Server backups, organizations can ensure that they won’t lose their valuable data in the event of accidents, ransomware attacks, or system failures.

Key Features of Windows Server Backup

Administrators can utilize block-level backups to back up an entire server, specific files, folders, or selected storage volumes. The only limitation here is that the data size must be under 2 TB.

With Windows Server 2008 R2, administrators can create faster and more compact incremental backups. Additionally, they can restore Windows to dissimilar hardware, among other advanced features.

Limitations of Windows Server Backup:

Windows Server Backup does not recognize or back up the configuration and hardware settings of virtualized Windows servers.

Full data restoration is only possible using Hyper-V and not with other hypervisors or VMware.

There are challenges when it comes to storing Windows Server backups on network locations.

Backup and Restore Data with AOMEI Cyber Backup

If you’re looking for an alternative to Windows Server Backup that offers advanced features and a more user-friendly experience, consider using AOMEI Cyber Backup.

AOMEI Cyber Backup allows you to schedule automatic backups for specific files or the entire system. It can quickly restore the server in case of OS damage, offering swift server restoration. Additionally, the software offers numerous other useful features.

  • Fully aligned with the 3-2-1 backup rule, allowing data backups to local disks, external hard drives, USB drives, network shares, NAS, and cloud storage.
  • Easily manage backups from a central console, providing comprehensive protection for Windows data.
  • An intuitive interface makes managing backups simple and straightforward.
  • Offers complete image-based backups for both physical and virtual environments, enhancing your data protection strategy.

To learn how to back up Windows Server using AOMEI Cyber Backup, follow the step-by-step guide below.

To Backup Windows Server Data with AOMEI Cyber Backup:

1.Install the AOMEI Cyber Backup Agent on your target device before creating a Windows server backup.

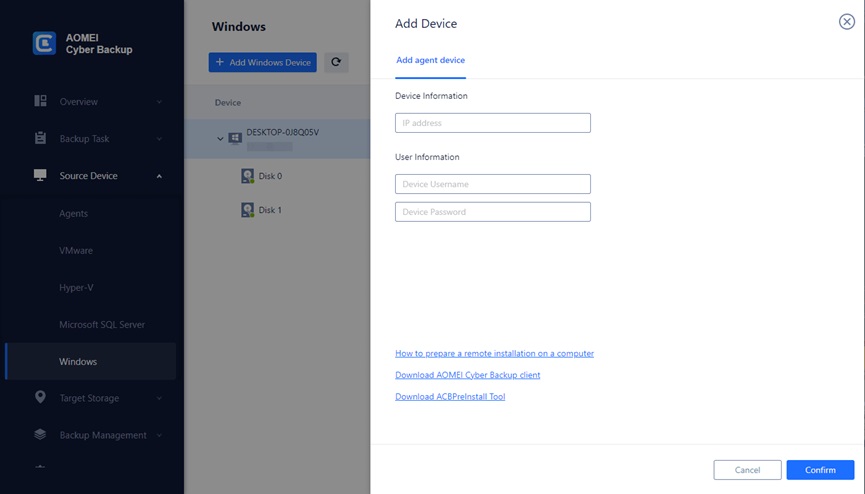
2. Add Windows Device: Navigate to Source Device, then enter the correct IP address and user information.

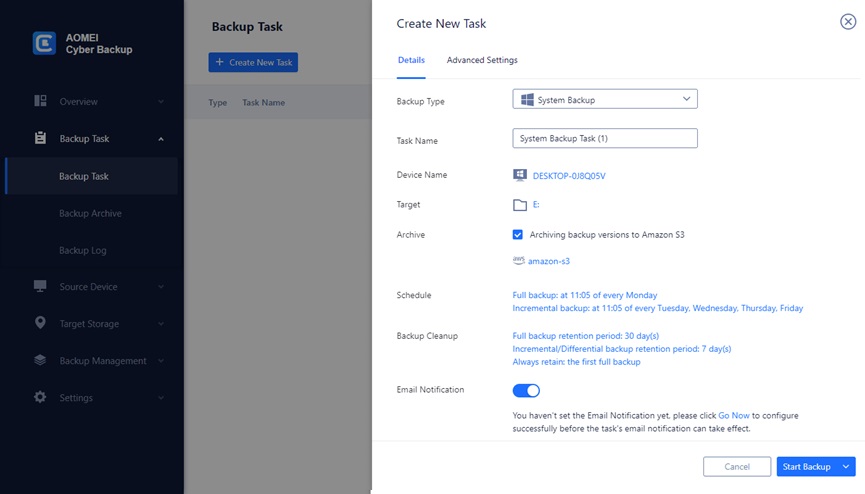
3. Create a Backup Task: Go to Backup Task > Create New Task > System Backup.

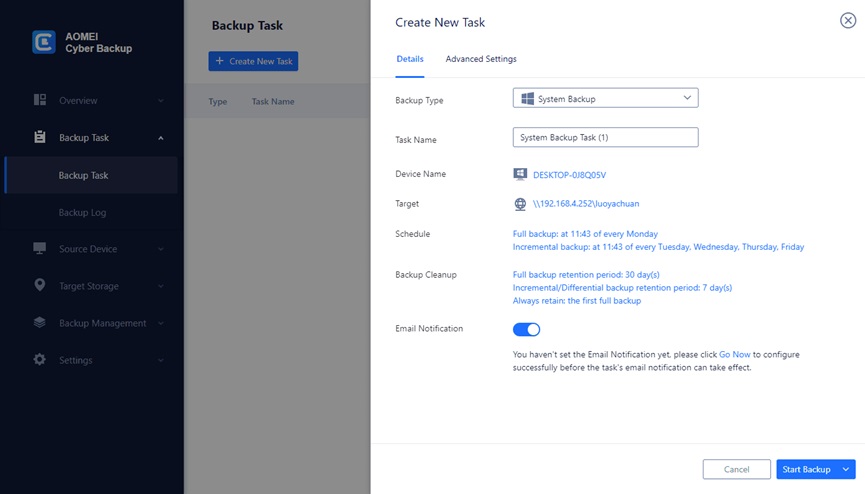
  • Select Your Windows Server from the list.
  • Choose a Destination: Save the backup to a local or external disk. You can also archive system backups to cloud environment.
  • Schedule Backups: Set up daily, weekly, or monthly backup tasks.

4.Start the Backup: Click Start Backup to protect your Windows Server data.

  • Optional Upgrades: Enhance your backup capabilities with more features, such as:
  • Backing up more Windows Servers
  • Flexible retention policies
  • Easy restoration to new locations

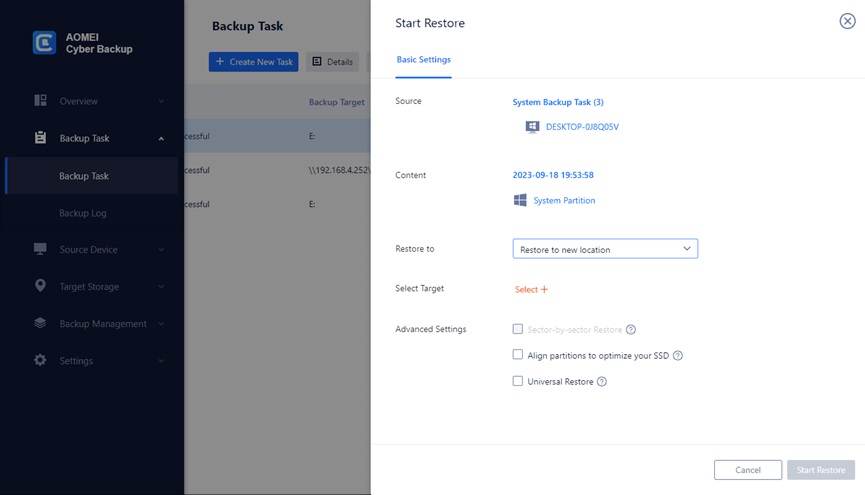
To restore Windows Server data with AOMEI Cyber Backup:

  • Go to Backup Taskpage, find the task you want to restore database from, and click -> Restore.

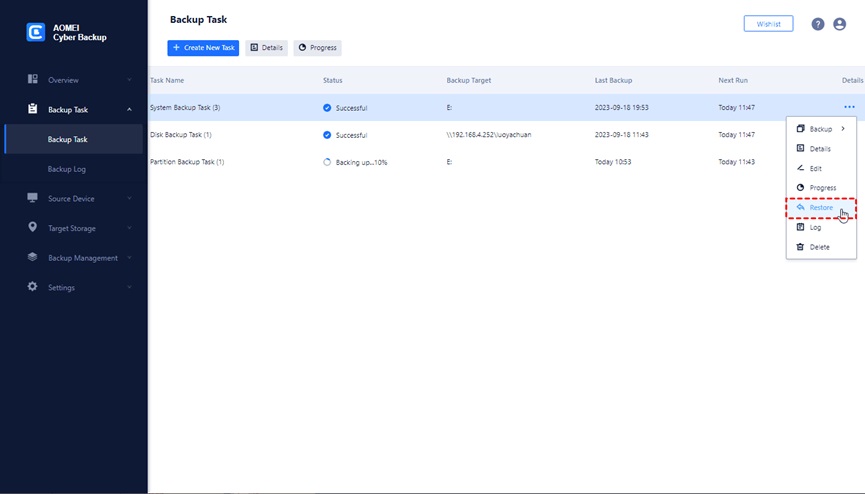
  • Select the specificsystem backupthat you want to restore, and click OK.
  • Select the target location that you want to restore to. By default, it will Restore to original location.

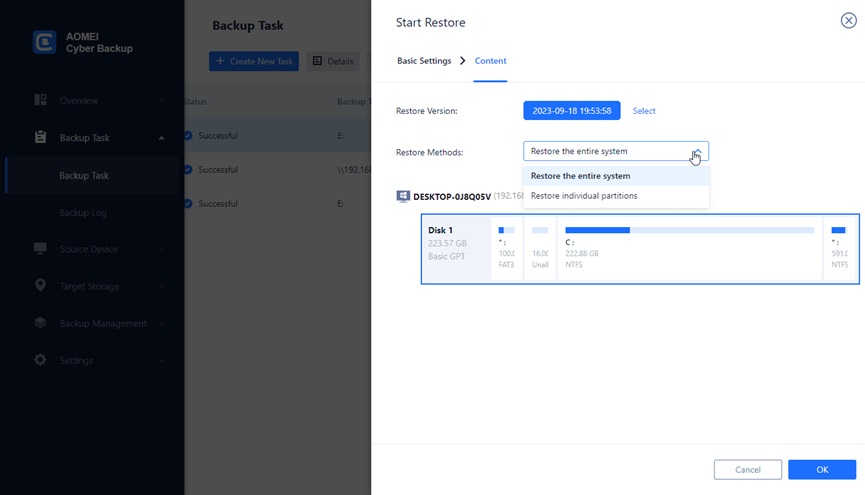
If you want to Restore to new location, you need to select target and specify the name of the new database. You can also modify the storage location.

Windows Server Backup FAQs

Q: What types of backups can I perform with AOMEI Cyber Backup?

A: AOMEI Cyber Backup allows you to perform system backups, disk backups, partition backups, file backups, and SQL database backups.

Q: Does AOMEI Cyber Backup support backup of virtual machines?

A: Yes, AOMEI Cyber Backup supports the backup and recovery of virtual machines, including VMware backup and Hyper-V backup.

Q: Is AOMEI Cyber Backup suitable for large environments?

A: Yes, AOMEI Cyber Backup is scalable and can be used in large environments. It offers centralized management, automated backup schedules, and support for multiple types of backups, making it a robust solution for enterprises.

Conclusion

Windows Server Backup is a valuable tool for backing up servers running Windows Server OS. While it offers basic backup and restore functionalities, it has limitations, especially when it comes to backing up virtual machine configurations.

For comprehensive server backup and restore solutions, consider downloading and installing AOMEI Cyber Backup. AOMEI Cyber Backup provides an array of advanced features and tools that surpass those offered by Windows Server Backup.

Mastering Remote Desktop File Transfer: Your Ultimate Guide

0

How to transfer files using remote desktop?

Remote working has become an important part of global business operations. It’s important to manage and transfer files between different places effectively and remotely control computer from another computer. Remote desktop file transfer is a crucial solution, enabling seamless workflows and ensuring that essential data is always accessible, no matter where you are. Imagine you’re working from home and need to access files from your office computer. This shows why remote desktop file transfer is so important.

Want to know how to transfer files to remote desktop? In this comprehensive guide, we’ll introduce you to the best ways to remote desktop file transfer and explain the benefits to keep your productivity high.

Benefits of remote desktop file transfer via AnyViewer

Among the various remote desktop software options, AnyViewer stands out as a top choice for remote desktop file transfer. It’s known for its user-friendly interface and robust features. AnyViewer offers higher cross-platform compatibility, ensuring you can transfer files between different operating systems effortlessly. Its strong security measures, including end-to-end encryption and two-factor authentication, make it a reliable choice for both personal and professional use.

In addition, AnyViewer offers different ways to transfer files that simplify the entire remote desktop file transfer process. With just a few clicks, you can access any file on your remote computer.

AnyViewer has many excellent benefits that make it the top choice. There are many benefits to using AnyViewer for remote desktop transfer files.

  • Free Version

If you want to find free software for remote desktop file transfer, AnyViewer is your best choice. It provides a free plan for both personal and commercial use with comprehensive features. Even with the free version, you can work with remote desktop file transfer without any limit. For those who are looking for a free solution, there is no better choice than AnyViewer.

  • Efficiency & Speed

The AnyViewer file transfer is renowned for its exceptional speed and efficiency, enabling seamless file sharing between computers and servers. It works perfectly on all devices, regardless of the operating system. For Windows users seeking advanced features, AnyViewer offers a robust File Manager equipped with extensive administrative and management tools.

  • Ease of Use

Sharing documents with colleagues, and clients, or managing folders within IT teams is easy with AnyViewer. It boasts lightning-fast transfer speeds and a user-friendly interface. The straightforward copy-and-paste functionality simplifies remote file transfers, making the process quick and hassle-free. Just a few clicks and your transfer starts right away!

  • High-Security Standards

With AnyViewer, your data stays secure during transfers between remote computers. It uses Elliptic Curve Cryptography (ECC) encryption and two-factor authentication to protect your files from unauthorized access.

  • No Limits

AnyViewer imposes no restrictions on file sharing. You can transfer files swiftly and securely, regardless of their size or frequency. Additionally, AnyViewer grants access to files and folders on remote desktops, both inside and outside the office, facilitating flexible and remote work from any location.

Besides, AnyViewer provides three different ways for remote desktop file transfer, allowing you to choose the option that works best for you.

  • Drag-and-Drop File Transfer

Effortlessly transfer files by clicking and holding the files you want, dragging them from your local desktop window to the remote computer’s screen, and dropping them to complete the transfer process.

  • Off-Session File Transfer

Easily move files between computers using the File Transfer Manager, without needing to enable a remote connection.

  • In-Session File Transfer

During an active remote session, access the toolbar at the top-middle of the remote window, click on the File option to open the File Transfer Manager, and transfer files seamlessly.

Step for remote desktop file transfer with AnyViewer

Remote desktop file transfer has never been easier with AnyViewer. Here’s how to transfer files to remote desktop seamlessly with AnyViewer.

Step 1. Before proceeding, download and launch AnyViewer on the remote computer. To create an AnyViewer account, go to the “Log in” and click “Sign up“.

Step 2. Install AnyViewer on your local computer and log in with the same AnyViewer account credentials.

Step 3. Go to the “Device” to view connected devices. Select the target computer from the list and click on “File Transfer.”

Step 4. A File Transfer Manager window will appear. Choose the files you wish to transfer and utilize the directional arrows to move files between your local and remote computers.

Conclusion

Mastering remote desktop file transfer is essential in today’s remote working environment. It enables seamless access and management of critical data from any location. Among the top tools, AnyViewer stands out with its intuitive interface, robust features, and high-security standards, making it a perfect choice for both personal and professional use.

Over the past six years, AnyViewer has earned the trust of over 60 million users, showcasing its popularity and reliability in the market. By following the steps and tips provided, you can ensure efficient and secure file transfers, maintaining productivity and operational efficiency no matter where you are.

Free Data Recovery Software – MyRecover & Reviews

0

MyRecover is a free data recovery software that is suggested for individuals confronting data misfortune circumstances, for example, accidental deletion, disk formatting, virus infection, and so on. Memories are made as we go about our daily lives. Keep in mind that having a camera or mobile phone is not expensive. Many of us store these images on our computers for a variety of reasons, such as to save space or protect our privacy.

Albeit this might appear to be smart, yet there is generally a gamble. To accidentally delete these photos from the saved hard drive, be that as it may, it can prompt enormous issues. So, how can we get our lost photos back?

Recovering from a backup is the obvious option. However, this approach is pointless if you do not routinely create backups. Yet, there is not a glaringly obvious explanation to be apprehensive. You can likewise depend on a free data recovery software like MyRecover.

We should plunge further into this product and test it to check whether it can proficiently recover deleted photos on a Windows 10 PC.

How can MyRecover assist?

MyRecover is a dependable Windows data recovery software developed by AOMEI Tech that has a large global user base. A free Windows programming permits you to recover deleted or lost files effectively and rapidly in different misfortune circumstances, which has a high success rate.

To empower you to all the more likely figure out this product. We have compiled a list of benefits and drawbacks for your information:

Benefits

  • Offers free data recovery for files up to 500 MB. Its intuitive user interface makes it accessible to even novices.
  • Utilizes advanced scanning strategies to improves your chances of successfully locating recoverable files and recovering them without losing quality.
  • During the scanning process, it provides options for preview, search, filter, and recovery.
  • Adaptable to a wide range of storage options, including HDDs, SSDs, USB drives, SD cards, digital cameras, and more.
  • Supports more than 200 file types, such as documents, images, videos, audio, compressed files, and web pages, among others.
  • Works well with Windows 7, 8, 10, 11, and Windows Server 2012, 2016, 2019, 2022, and other Windows operating systems.

Drawbacks:

As of now just Windows systems are upheld.

Steps and outcomes of the test for MyRecover

Let’s get started with the test now. You see every one of the tests. Counting the speed capability and generally speaking recovery rate. Before we continue, we download this free recovery programming from the authority site and introduce it on our PC.

During the test, we deleted two PNG pictures utilizing the Shift + Delete keys to make the data recovery process more difficult. After that, we launch MyRecover and see a list of all available hard drives. We choose the drive to scan that contains the deleted files.

The software performs a quick scan first, then a thorough scan to locate all of the hard drive’s recoverable files. Impressive is the quickness of the scanning process, which scans approximately 100 kilobytes of data in just five minutes.

By typing “.png” into the search box and selecting the image file type from the filter options to locate deleted files quickly. We can also use the search and preview functions. We will diminish your pursuit. If we have this information, we may also specify the date modification or file size.

After we have affirmed the two deleted PNG pictures, we select them and snap on the “Recover” button to check in the event that MyRecover can save them or not. The software then prompts us to pick a location for the restored files.

Following a couple of moments, MyRecover shows a message that the file recovery was effective, and we confirm this by really taking a look at the recovery path. It is important to note that the software also preserves the original folder structure and guarantee that the recovered images will not lose their quality.

In End

Altogether, MyRecover found and recovered two deleted PNG pictures in practically no time. If you lose data, like photos, videos, audios, documents (e.g. recover WPS file), etc., try this software! It applies to different misfortune situations, such as accidental deletion, disk formatting, and more.

How to Recover Deleted Files from USB without Software

0

Recovering deleted files from USB without using software is a common concern for many users. We all know how valuable these files are. And losing them can be a real headache. Whether it’s because of a virus attack or accidental deletion. File loss is something we all want to avoid. Luckily, the good news is that you can recover lost files and important information.

But here’s this: You don’t always need special software to recover erroneously deleted files from USB flash drives. Contrary to common belief, there are ways to restore these files without relying on file recovery software.

Can You Recover Permanently Deleted Files from USB without Software?

Now you may wonder whether it is possible or not to recover deleted files from USB without software. The answer is, yes. When files are erased, the area they use on USB drives will be marked as new. However, delete items are not removed immediately. If you understand this concept, you can recover the delete files.

One option is to check your computer’s trash or recycling tank. If you delete files from your USB drive while it’s connected to your computer, there’s a chance that these directories may still have them. The other option is using the “previous generation” feature that exists in various operating systems. This feature allows you to recover data that’s lost from a trash or a recycled tank. Also, Windows File Recovery is a tool that can help you recover the contents of USB drives.

It is worth noting that the way these manuals have their limitations. They work best for recently deleted files as USB drives may have been overused and overwritten since then.

Now let’s get to how you can recover deleted files from USB with or without software. Here are several effective ways:

Method 1: Recover USB through the “Recover Previous Version” feature.

You can use this method without using any additional tools to recover deleted files from USB. Before trying this step, make sure the file history is set to automatically back up your files.

  • Connect the USB flash drive and turn on “This PC” from the Start Menu.
  • Right-click on the USB drive and select “Properties” from the list.
  • Go to the “Previous” tab to explore other recovery options.
  • Click “Restore” and select the previous version to recover the file.

Method 2: Use Windows File Recovery to recover deleted files from USB

Windows File Recovery is a useful application for Windows 10 version 2004 and above. It allows you to recover items you deleted from any USB drive.

  • Get Windows File Recovery from Microsoft Store
  • Messages of your USB drive before connecting to your computer
  • Open Command Prompt (CMD) in admin mode
  • Enter “winfr E: C: /extensive” (replace “E:” with the drive letter of your USB and “C:” with the drive letter of the storage device where you want to save the recovered files).
  • Windows File Recovery will start the process and try to recover lost files.

Method 3: Recover removed files from USB using WinfrGUI

WinfrGUI is a powerful data recovery freeware for Windows 10 and 11, which can recover damaged files quickly and easily.

  • Install WinfrGUI on your Windows 10/11 computer
  • Open the software and start the scan.
  • View the scanned files before proceeding.
  • Select the file you want to recover and click on “Recover”.
  • Select a location to store the received and completed process.

Method 4: Recover removed files from USB using CMD (Command Prompt) without software.

Using command line language in Windows, you can recover deleted data from USB drives. However, this method requires familiarity with command lines and may not guarantee the recovery of all delete files.

  • Connect your PC to a USB flash drive and start the program using the Win + R buttons.
  • In the dialog box, type “cmd” and click OK to open Command Prompt.
  • Execute the following commands in the specified order:
  • chkdsk X: / f (replace “X” with the assigned drive letter of your USB flash drive).
  • Properties -h-r-s G:*.* /s /d (replace “G” with the letter that represents your USB drive on the computer).
  • When the process is complete, check the recovered data on the flash drive.

It is important to note that USB drives are not designed for long-term file storage, even though they will store data for many years. In order to ensure that important information is secure. It is always a good idea to have a backup plan.

Conclusion

In conclusion, you do not need software to recover data from USB drives. By following the methods mentioned above, you can increase your chances of receiving valuable data. Do not forget to do it quickly and carefully when deleting data to increase your chance of successful recovery.

Preview and Transfer Photos from PC to iPhone Easily

0

Why Do You Want to Transfer Photos from PC to iPhone?

People often store photos on various devices such as computers, cameras, and mobile phones. You might need to transfer photos from your PC to your iPhone when you get a new device, after editing them on your computer, or when you want to transfer downloaded images from websites to your iPhone.

However, due to system limitations, moving files between an iPhone and a Windows computer can seem complicated. But don’t worry, I’ve found a very simple method that lets you selectively transfer photos from your computer to your iPhone.

Preview & Selective to Transfer Photos from PC to iPhone

I have a lot of pictures on my computer, so I want to preview and selectively transfer some of them to my iPhone. I was using iTunes or iCloud before to move files from PC to iPhone. However, these methods can be slowly and cumbersome when transferring a large number of files or I forget my Apple ID.

In such cases, FoneTool offers the simplest steps to get the job done easily. The first time I used FoneTool to transfer my iPhone photos, I was amazed by its performance. Unlike the conventional methods I had tried before, FoneTool transferred 100 high-quality photos in just 2 seconds. This rapid transfer speed was incredibly useful, especially when I was in a hurry!

Below I list more highlights of this iPhone transfer tool:

  • Preview and Selective Transfer: Allows you to preview data such as videos, contacts, photos, music, and messages before transferring them to your iPhone.
  • Transfer All Desired iPhone Photos: It can scan all photos on your computer, including those in the different local folders.
  • High Transfer Speed: Whether it’s a lot of files or large files, FoneTool helps you transfer quickly, without Apple ID restrictions.
  • Multiple Transfer Functions: Supports transfers from iPhone/iPad to computer, iPhone to iPhone/iPad, and vice versa.
  • Professional and Safe: Utilizes specialized USB network-free transmission technology to prevent privacy leaks through wireless transmission.
  • Maintain Original Photo Quality: Ensures that the photos transferred to your PC are saved without any loss of quality from your iPhone.
  • Wide Compatibility: FoneTool supports iPhones, iPads, and iPods, and is compatible with the latest iOS versions.

Simple Steps to Transfer Images from Computer to iPhone

No matter how much data you want to transfer, now you can follow the steps below to transfer files from PC to iPhone by using FoneTool. The following are simple steps for selectively transfer photos, but these steps also apply to sending other files from computer to iPhone, like transferring music from Windows 10 to iPhone.

Step 1. Use a USB cable to connect the iPhone to the PC > Install and open FoneTool.

Step 2. Choose Phone Transfer on the left panel > Move the mouse to choose the PC to iPhone option > Tap Start Transfer.

Step 3. Click the + icon to preview and select the pictures that you want to send to your iPhone (You can check Select All if you prefer to move all pictures) > Then tap OK.

Tip: In addition to the photos, you can also choose to transmit music, contacts, videos, messages, etc. Just need to click the corresponding button to easily complete the transmission task.

Step 4. Click Transfer Settings section > Decide a storage location to save the photos > Click the Start Transfer to begin the process.

Tip: FoneTool supports all kinds of image formats, including .jpg .png .gif .heic .jpeg .bmp .tif .tiff .crw .raf .cr2 .cr3 .kdc .mrw .ptx .pef .nef .orf .dng .arw .x3f .rw2.

In addition, FoneTool offers an iPhone to iPhone transfer feature that allows you to send everything from your old iPhone to your new iPhone with just one click. Simply connect both iPhones to your computer > Go to Phone Transfer > Select iPhone to iPhone, and follow the on-screen instructions.

More, above all, this device will help create magical living room canvas wall art photos prints where desired.

Conclusion

That’s all about how to transfer photos from your computer to iPhone. FoneTool allows for selective photo transfers, offering a simpler and quicker way to share files between your iPhone and PC. You can preview your pictures before transferring them. Additionally, its convenient features make it easy to transfer photos from one iPhone to another.